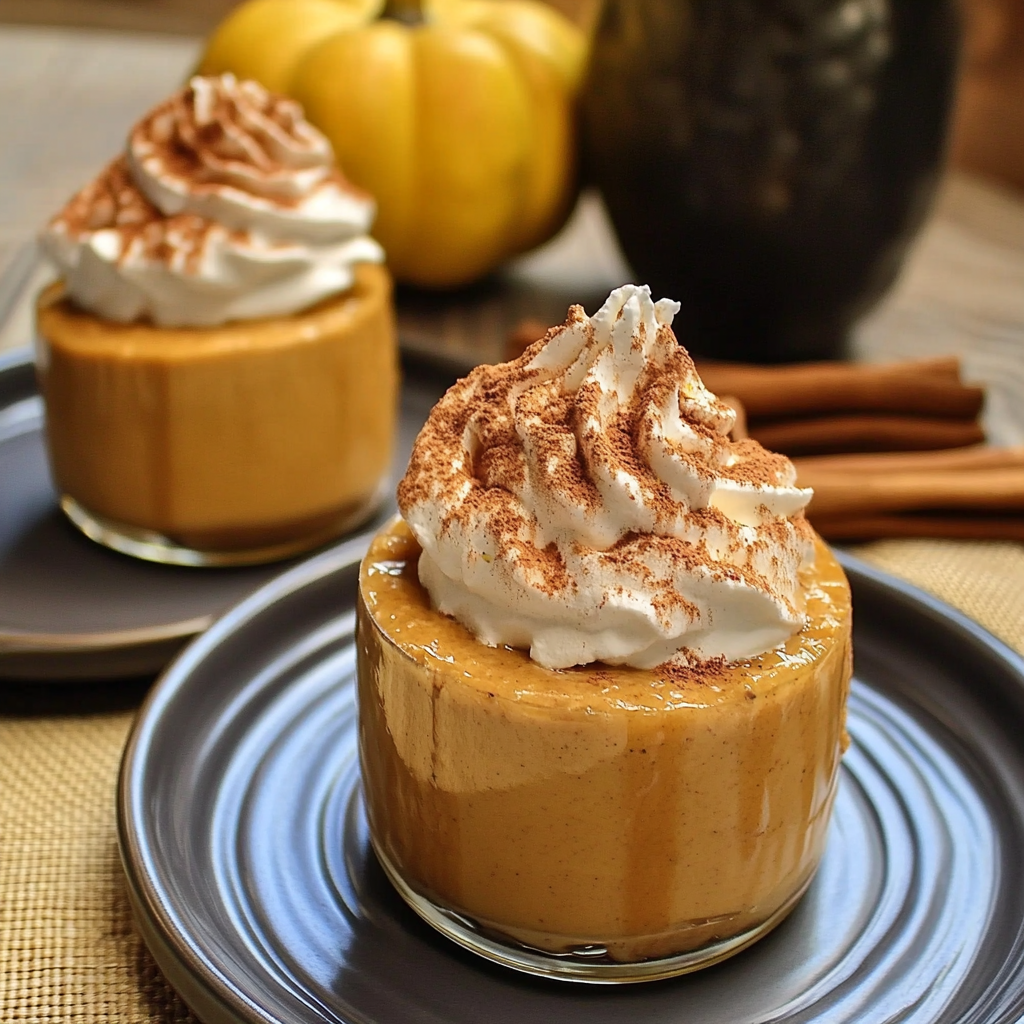
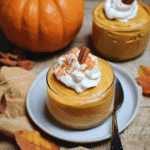
There’s something magical about dessert that makes the world feel just a little brighter, especially when it comes to no-bake pumpkin mousse cups. Imagine sinking your spoon into creamy layers of spiced pumpkin goodness, topped with a swirl of whipped cream that could make even the most stoic person smile. The aroma of cinnamon and nutmeg wafts through the air, wrapping you in a cozy embrace like your favorite blanket on a chilly autumn day.
Now, picture this: you’re hosting a gathering, and as friends and family gather around, you unveil your masterpiece—a tray of these delightful no-bake pumpkin mousse cups. Everyone gasps in delight! That’s right; you’ll be the star of the show, and trust me, once they taste this velvety treat, they won’t stop raving about it until next pumpkin season rolls around.
Why You'll Love This Recipe
- These no-bake pumpkin mousse cups are incredibly easy to whip up, making them perfect for any last-minute gatherings or potlucks.
- The flavor is an exquisite blend of sweet and spicy, reminiscent of fall with every bite.
- Visually stunning, they elevate any dessert table with their elegant presentation in individual cups.
- Plus, they’re versatile enough to adapt to various dietary needs—just swap ingredients as needed!
Ingredients for no-bake pumpkin mousse cups
Here’s what you’ll need to make this delicious dish:
- Canned Pumpkin Puree: Opt for 100% pure pumpkin puree for the best flavor; avoid pumpkin pie filling which is sweetened.
- Heavy Whipping Cream: Use cold heavy cream for whipping; it creates that luscious texture we all love in mousse.
- Granulated Sugar: A touch of sugar balances out the spices and enhances the natural sweetness of the pumpkin.
- Ground Cinnamon: This spice brings warmth and earthiness; feel free to add more if you’re a cinnamon fanatic!
- Ground Nutmeg: Just a pinch adds depth; fresh nutmeg will amp up the flavor if you have it on hand.
- Vanilla Extract: Pure vanilla extract elevates the flavors and adds that irresistible aromatic quality.
The full ingredients list, including measurements, is provided in the recipe card directly below.
How to Make no-bake pumpkin mousse cups
Follow these simple steps to prepare this delicious dish:
Step 1: Prepare Your Ingredients
Gather all your ingredients and tools—this includes mixing bowls, a whisk (or electric mixer if you’re feeling fancy), and those adorable little cups or jars you’ll be serving your mousse in.
Step 2: Whip Up the Cream
In a medium bowl, pour in the cold heavy whipping cream. Use a whisk or electric mixer to whip it until soft peaks form. It should look fluffy and light like clouds floating on a sunny day.
Step 3: Combine Pumpkin Mixture
In another bowl, combine canned pumpkin puree, granulated sugar, ground cinnamon, ground nutmeg, and vanilla extract. Mix until everything is well blended and smooth—think of it as creating your own delicious fall potion.
Step 4: Fold It All Together
Gently fold half of the whipped cream into the pumpkin mixture until combined. Then fold in the remaining whipped cream until you see beautiful swirls—it’s like watching art come to life!
Step 5: Spoon Into Cups
Using a spatula or spoon, carefully scoop your creamy mixture into individual serving cups or jars. Don’t worry about making it perfect; rustic charm is in style!
Step 6: Chill & Serve
Refrigerate these beauties for at least two hours (or overnight if you can wait). When ready to serve, add an extra dollop of whipped cream on top for flair—and maybe even sprinkle some cinnamon for good measure!
Transfer those glorious no-bake pumpkin mousse cups onto your table and watch as everyone dives into them with joyful abandon. Enjoy every moment—you’ve earned this sweet victory!
You Must Know
- These no-bake pumpkin mousse cups are not just a dessert; they are your ticket to a stress-free, autumn-inspired delight.
- Whip them up in a flash and watch as they vanish faster than you can say “pumpkin spice latte.” Perfect for entertaining or a cozy night in.
Perfecting the Cooking Process
Start by whipping the heavy cream until it forms soft peaks. Meanwhile, mix the pumpkin puree with sugar, spices, and cream cheese. Gently fold the whipped cream into the pumpkin mixture for a light texture. Finally, layer it all into cups and chill.
Add Your Touch
Feel free to customize these no-bake pumpkin mousse cups! Swap out the cream cheese for coconut cream for a dairy-free option. Add some chocolate chips or crushed ginger snaps for a delightful crunch. The possibilities are endless!
Storing & Reheating
Store your no-bake pumpkin mousse cups in airtight containers in the refrigerator for up to three days. They taste even better after chilling overnight! Avoid reheating; enjoy them cold for the best texture and flavor.
Chef's Helpful Tips
- Use pure pumpkin puree instead of pumpkin pie filling for better control over sweetness and spices.
- Make sure your heavy cream is very cold before whipping to achieve maximum fluffiness.
- For a decorative touch, top with whipped cream and a sprinkle of cinnamon before serving.
Sometimes I whip these up just to impress my friends, and let me tell you, their faces light up like kids on Christmas morning when they taste them!
FAQs :
What are no-bake pumpkin mousse cups?
No-bake pumpkin mousse cups are a delightful dessert made with creamy pumpkin puree, whipped cream, and warm spices, all layered into individual serving cups. This recipe allows you to enjoy the flavors of pumpkin pie without the need for baking. The light and airy texture of the mousse makes it a perfect treat for festive occasions or everyday enjoyment. You can easily customize these cups with your favorite toppings like crushed cookies, nuts, or a drizzle of caramel sauce.
How long do no-bake pumpkin mousse cups last in the fridge?
No-bake pumpkin mousse cups can typically be stored in the refrigerator for up to three days. To ensure maximum freshness, cover them tightly with plastic wrap or transfer them to an airtight container. It’s important to note that as they sit, the texture may change slightly due to moisture absorption. For best results, enjoy these delicious desserts within the first couple of days after preparation.
Can I make no-bake pumpkin mousse cups ahead of time?
Yes, you can definitely prepare no-bake pumpkin mousse cups ahead of time! In fact, making them a day in advance often enhances the flavors and allows the mousse to set properly. Simply layer the ingredients in your serving cups and store them covered in the refrigerator until you’re ready to serve. This makes them an excellent choice for holiday gatherings or special events where you want to save time on day-of preparations.
What can I use as a substitute for heavy cream in no-bake pumpkin mousse cups?
If you prefer a lighter option or need a dairy-free alternative for your no-bake pumpkin mousse cups, you can substitute heavy cream with coconut cream or whipped coconut milk. Both options provide a rich and creamy texture while adding a subtle flavor that complements pumpkin beautifully. For those looking for lower-calorie substitutes, using whipped topping or Greek yogurt can also work well, although they may alter the texture slightly.
Conclusion for no-bake pumpkin mousse cups :
In summary, no-bake pumpkin mousse cups offer an easy and delicious way to enjoy autumn flavors without any baking required. With simple ingredients like pumpkin puree and heavy cream, these treats come together quickly and can be made ahead of time. They are versatile enough to allow for customization with various toppings. Perfect for gatherings or cozy nights at home, this dessert will surely impress family and friends alike!
No-Bake Pumpkin Mousse Cups
- Prep Time: 15 minutes
- Cook Time: 0 minutes
- Total Time: 15 minutes
- Yield: Serves 4
- Category: Dessert
- Method: No-bake
- Cuisine: American
Description
Indulge in these creamy no-bake pumpkin mousse cups, an effortless autumn treat that delights with every luscious bite.
Ingredients
- 1 cup canned pumpkin puree
- 1 cup heavy whipping cream
- 1/3 cup granulated sugar
- 1 tsp ground cinnamon
- 1/4 tsp ground nutmeg
- 1 tsp pure vanilla extract
Instructions
- Prepare Your Ingredients: Gather all ingredients and tools—mixing bowls, a whisk or electric mixer, and serving cups or jars.
- Whip Up the Cream: In a medium bowl, pour in cold heavy whipping cream. Whisk until soft peaks form and it looks fluffy.
- Combine Pumpkin Mixture: In another bowl, mix canned pumpkin puree, granulated sugar, ground cinnamon, ground nutmeg, and vanilla extract until smooth.
- Fold It All Together: Gently fold half of the whipped cream into the pumpkin mixture until combined. Then fold in the remaining whipped cream until swirls are visible.
- Spoon Into Cups: Carefully scoop the mousse into individual serving cups or jars.
- Chill & Serve: Refrigerate for at least two hours (or overnight). Top with an extra dollop of whipped cream and a sprinkle of cinnamon before serving.
Nutrition
- Serving Size: 1 cup (240g)
- Calories: 300
- Sugar: 20g
- Sodium: 50mg
- Fat: 22g
- Saturated Fat: 14g
- Unsaturated Fat: 6g
- Trans Fat: 0g
- Carbohydrates: 29g
- Fiber: 3g
- Protein: 4g
- Cholesterol: 70mg
Keywords: - For a dairy-free option, substitute heavy cream with coconut cream. - Add crushed ginger snaps or chocolate chips for added texture. - Store leftovers in airtight containers in the fridge for up to three days.

Leave a Comment