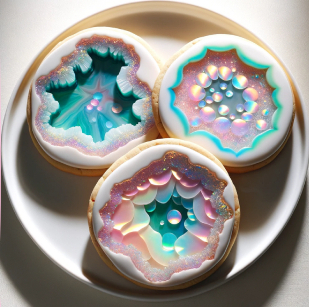
The sweet scent of freshly baked cookies fills the air, dancing around your kitchen like a happy little elf on a sugar high. Imagine biting into a cookie that looks like it belongs in a geology textbook—crunchy on the outside with a treasure trove of colorful candy crystals hiding inside. Yes, we’re talking about Geode Cookies, the whimsical treat that’s as fun to make as it is to eat!
These delightful morsels are not just cookies; they’re edible art pieces that spark joy and excitement at any gathering. Perfect for birthday parties, bake sales, or just because you feel like it (which is always a valid reason), these cookies will have your friends asking if you’ve secretly enrolled in culinary school. Spoiler alert: you haven’t!
Why You'll Love This Recipe
- Geode Cookies are surprisingly easy to make, so you won’t need to summon your inner pastry chef.
- The flavor combination of sweet dough and sugary gems creates an explosion of taste in every bite.
- Their stunning visual appeal makes them the showstopper at any event or gathering.
- Plus, they are highly versatile; customize the colors and shapes to suit any occasion or whim!
Ingredients for Geode Cookies
Here’s what you’ll need to make this delicious dish:
- All-Purpose Flour: Essential for structure, use unbleached flour for the best results.
- Sugar: Granulated sugar will provide sweetness, while brown sugar adds moisture and depth of flavor.
- Baking Soda: This will help your cookies rise beautifully.
- Salt: Just a pinch enhances the overall flavor profile.
- Unsalted Butter: Make sure it’s softened; this helps create a rich, buttery texture.
- Vanilla Extract: Use pure vanilla extract for that aromatic touch of sweetness.
- Eggs: Two large eggs will bind everything together nicely.
- Candy Crystals: These are your geodes! Choose vibrant colors for maximum visual impact.
The full ingredients list, including measurements, is provided in the recipe card directly below.
How to Make Geode Cookies
Follow these simple steps to prepare this delicious dish:
Step 1: Preheat Your Oven
Preheat your oven to 350°F (175°C) and line a baking sheet with parchment paper. This is where the magic happens!
Step 2: Mix Dry Ingredients
In a bowl, whisk together all-purpose flour, baking soda, and salt until well combined. This dry mix will set the foundation for your flavorful cookies.
Step 3: Cream Butter and Sugars
In another bowl, beat the softened unsalted butter with granulated and brown sugars until fluffy—a process that should take about two minutes. Add in vanilla extract and eggs one at a time; mix until fully incorporated.
Step 4: Combine Wet and Dry Ingredients
Gradually add the dry mixture into the wet mixture. Stir until just combined; don’t overmix unless you want chewy rocks instead of soft cookies.
Step 5: Add Candy Crystals
Gently fold in those colorful candy crystals—this is where our geode magic begins! Make sure they’re evenly distributed throughout the dough.
Step 6: Bake Them Up!
Scoop tablespoon-sized portions onto your prepared baking sheet, spacing them out generously. Bake for about 10-12 minutes or until edges are lightly golden but centers remain soft—just like life’s greatest joys!
Transfer to plates and let cool before serving. You’ll want to enjoy these beauties warm from the oven if possible!
Now that you have mastered making Geode Cookies, you can impress everyone around you with your newfound baking prowess! Feel free to get creative with different colored crystals or even shape variations—the sky’s the limit! So gather your ingredients and let’s turn your kitchen into a magical cookie wonderland!
You Must Know
- Geode Cookies are more than just a sweet treat; they’re edible works of art.
- Eye-popping colors and flavors come together to create a delightful experience for both the eyes and the taste buds.
- Perfect for parties or a fun baking day with kids, these cookies are sure to impress.
Perfecting the Cooking Process
Start by mixing your cookie dough, then chill it while you prepare your colorful geode-inspired toppings. Once chilled, scoop out the dough, roll it, and bake until golden brown. Finally, decorate with melted chocolate and sprinkles for that stunning geode effect.
Add Your Touch
Feel free to swap out the chocolate for different melting candies or even add nuts for an extra crunch. Experiment with flavor extracts like almond or peppermint instead of vanilla for a unique twist on classic Geode Cookies.
Storing & Reheating
Store your Geode Cookies in an airtight container at room temperature for up to a week. If you want to enjoy them warm, pop them in the microwave for about 10 seconds before serving to bring back that fresh-baked goodness.
Chef's Helpful Tips
- To achieve perfect Geode Cookies, chill your dough well before baking to retain shape.
- Use high-quality melting chocolate for vibrant colors and better flavor.
- Don’t skimp on sprinkles; they make your cookies pop with personality!
Baking these Geode Cookies reminds me of that time my niece declared I was “the coolest aunt ever” because I let her choose the colors for the decorations. It was pure joy watching her creativity shine through!
FAQs:
What are Geode Cookies?
Geode cookies are a delightful treat that mimic the appearance of geodes, which are rock formations filled with crystals. These cookies usually feature a cookie base decorated with vibrant candies or sugar crystals that resemble the sparkling minerals found inside a geode. They are not only visually stunning but also delicious, making them perfect for special occasions or as fun baking projects for kids.
How do I make the filling for Geode Cookies?
To create the beautiful crystal-like filling for geode cookies, you’ll need to use hard candies like rock candy or Jolly Ranchers. Simply crush the candies into small pieces and place them in the center of the cookie dough before baking. As the cookies bake, the candies melt and create a stunning, colorful effect that resembles real geodes, adding both flavor and visual appeal to your treats.
Can I customize Geode Cookies for different occasions?
Absolutely! Geode cookies can be customized for various themes and occasions. You can change the color of the sugar crystals or use different types of candy to match seasonal celebrations like birthdays, weddings, or holidays. By choosing colors and flavors that resonate with your event, you can create unique geode cookies that delight guests and add a personal touch to your celebration.
How should I store Geode Cookies?
To keep your geode cookies fresh, store them in an airtight container at room temperature. They will usually stay good for about a week. If you want to extend their shelf life, you can freeze them. Just make sure to separate layers with parchment paper to prevent sticking. When you’re ready to enjoy them again, let them thaw at room temperature before serving for optimal taste and texture.
Conclusion for Geode Cookies:
In summary, geode cookies offer a fun and creative way to impress friends and family with both their beautiful appearance and great taste. The simple process of making these cookies allows for customization based on personal preferences or special occasions. Remember to store them properly to maintain freshness and enjoy their delightful flavors longer. With this guide on geode cookies, you’re now equipped to create your own stunning treats at home!

Geode Cookies
- Prep Time: 15 minutes
- Cook Time: 12 minutes
- Total Time: 27 minutes
- Yield: Approximately 24 cookies 1x
- Category: Dessert
- Method: Baking
- Cuisine: American
Description
Delight in the whimsical beauty of Geode Cookies, featuring a crunchy exterior and a vibrant candy crystal filling that brings joy to every bite.
Ingredients
- 2 cups all-purpose flour
- 1 cup granulated sugar
- 1/2 cup brown sugar
- 1 tsp baking soda
- 1/4 tsp salt
- 3/4 cup unsalted butter, softened
- 2 large eggs
- 2 tsp vanilla extract
- 1 cup colorful candy crystals
Instructions
- Preheat your oven to 350°F (175°C) and line a baking sheet with parchment paper.
- In a bowl, whisk together flour, baking soda, and salt until combined.
- In another bowl, beat softened butter with granulated and brown sugars until fluffy. Add eggs one at a time, mixing in vanilla extract until fully incorporated.
- Gradually add the dry mixture into the wet mixture, stirring until just combined.
- Gently fold in the colorful candy crystals ensuring they are evenly distributed.
- Scoop tablespoon-sized portions onto the prepared baking sheet, spacing them out. Bake for 10-12 minutes until edges are lightly golden but centers remain soft.
- Transfer cookies to plates and allow to cool before serving.
Nutrition
- Serving Size: 1 cookie (30g)
- Calories: 150
- Sugar: 10g
- Sodium: 60mg
- Fat: 6g
- Saturated Fat: 4g
- Unsaturated Fat: 2g
- Trans Fat: 0g
- Carbohydrates: 22g
- Fiber: <1g
- Protein: <1g
- Cholesterol: 20mg
Keywords: Chill your dough before baking for better shape retention. Customize with different colors or types of candy crystals for themed occasions.


Leave a Comment