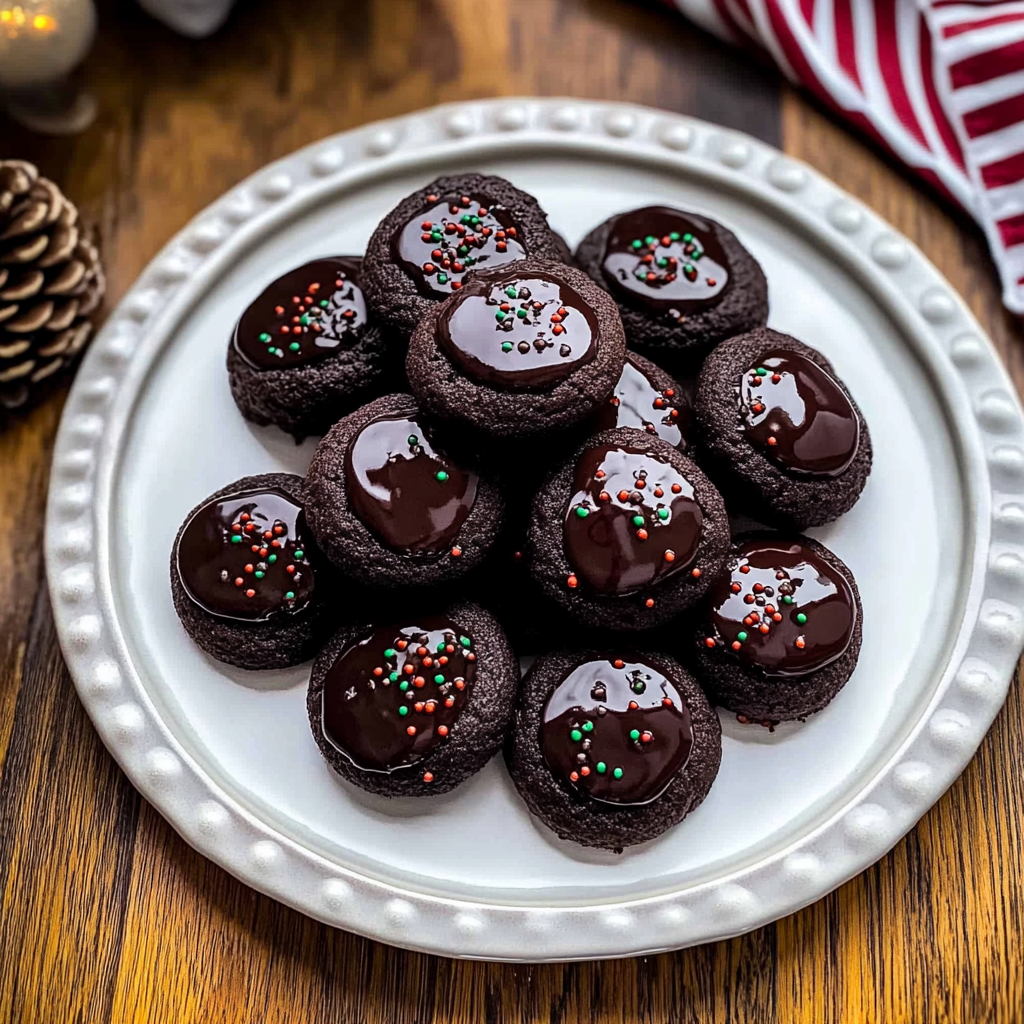
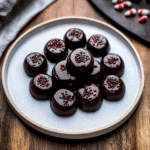
Chocolate thumbprint cookies are like little hugs for your taste buds. Imagine sinking your teeth into a soft, buttery cookie with a rich chocolate center that feels like a warm embrace on a chilly day. The aroma wafting through your kitchen will have everyone asking if they can help “taste-test.” These cookies are perfect for any occasion—whether it’s a festive gathering or just because you deserve something sweet today.
Every bite of these delightful treats takes me back to my childhood, where I spent countless afternoons baking with my grandma. She always said that the secret ingredient was love, but let’s be honest—it was probably the chocolate! These cookies not only bring joy to your palate but also create beautiful memories as you share them with family and friends. Get ready for an amazing flavor experience that will leave you smiling!
Why You'll Love This Recipe
- The ease of preparation means you won’t need a culinary degree to impress your friends and family.
- With their rich chocolate flavor, these cookies are sure to satisfy any sweet tooth.
- Visually appealing with their glossy chocolate centers, they look as good as they taste.
- Perfect for holiday parties or just a cozy night in, these cookies are versatile enough for any occasion!
Ingredients for Chocolate thumbprint cookies
Here’s what you’ll need to make this delicious dish:
- All-Purpose Flour: Essential for structure, sifted flour gives your cookies that perfect chewy texture.
- Cocoa Powder: Choose unsweetened cocoa powder for the best flavor, giving your cookies that deep chocolatey goodness.
- Granulated Sugar: Sweetens the dough and balances the cocoa bitterness; use white sugar for consistency.
- Butter: Room temperature butter adds richness and depth to the cookie dough; don’t skimp here!
- Eggs: One large egg binds everything together while adding moisture and richness.
- Vanilla Extract: A splash of vanilla enhances all the flavors; use pure extract for the best results.
- Baking Powder: This leavening agent helps your cookies rise just enough to stay airy while still being chewy.
- Chocolate Chips: Semi-sweet chocolate chips melt beautifully in the center of each cookie; feel free to mix types!
The full ingredients list, including measurements, is provided in the recipe card directly below.
How to Make Chocolate thumbprint cookies
Follow these simple steps to prepare this delicious dish:
Step 1: Preheat Your Oven
Preheat your oven to 350°F (175°C). Line a baking sheet with parchment paper to ensure easy cleanup—because let’s face it, no one wants a messy kitchen after all this sweet fun.
Step 2: Mix Dry Ingredients
In a medium bowl, whisk together the all-purpose flour, cocoa powder, and baking powder until well combined. This step ensures even distribution of ingredients and sets the stage for cookie greatness.
Step 3: Cream Butter and Sugar
In a large mixing bowl, cream together the softened butter and granulated sugar until light and fluffy. Use an electric mixer on medium speed for about three minutes—you want it airy enough to float away!
Step 4: Add Eggs and Vanilla
Beat in one large egg and add vanilla extract into the creamed mixture until fully incorporated. You’ll notice how wonderful it smells—if only we could bottle that scent!
Step 5: Combine Wet and Dry Ingredients
Gradually mix in the dry ingredients until just combined. Don’t overmix; we want our cookies tender, not tough! Gently fold in those delectable chocolate chips that will form the heart of each thumbprint.
Step 6: Shape and Bake
Scoop tablespoon-sized balls of dough onto your prepared baking sheet. Use your thumb (or any finger if you’re feeling wild) to create an indent in each cookie. Bake for about 10-12 minutes or until slightly firm around the edges but still soft in the center.
Transfer to plates once cooled slightly and enjoy these delightful treats with family or friends—or maybe keep them all to yourself!
You Must Know
- Chocolate thumbprint cookies are not just a treat; they are an experience.
- With their gooey chocolate centers and buttery, melt-in-your-mouth texture, they bring joy to any gathering.
- Perfect for sharing but equally delightful for solo munching during a Netflix binge.
Perfecting the Cooking Process
To achieve cookie perfection, preheat your oven first. While it warms up, mix your dough and chill it briefly. This ensures the cookies spread just right and maintain that soft center everyone loves.
Add Your Touch
Feel free to swap chocolate fillings with raspberry jam or peanut butter for a fun twist. Add nuts or dried fruit to the dough for extra texture. Get creative—your taste buds will thank you!
Storing & Reheating
Store your chocolate thumbprint cookies in an airtight container at room temperature for up to one week. If you want them warm again, pop them in the microwave for about 10 seconds before indulging!
Chef's Helpful Tips
- To ensure your chocolate thumbprint cookies come out perfectly, remember to chill the dough before baking.
- This helps prevent spreading too much in the oven.
- Always use high-quality chocolate for the filling; it makes a world of difference in taste.
- Try using a small ice cream scoop for uniform cookie sizes, ensuring even baking.
Baking these cookies always takes me back to my childhood kitchen, where flour flew like confetti as I attempted to help my mom bake. Those were some delicious messes!
FAQs :
What are chocolate thumbprint cookies?
Chocolate thumbprint cookies are delightful treats characterized by their rich chocolate flavor and a signature indented center that holds a dollop of jam or chocolate ganache. These cookies combine a buttery base with cocoa powder, creating a soft, chewy texture. The thumbprint allows for various fillings, making them customizable. They are perfect for holiday gatherings or as a sweet indulgence any time of year.
How do I store chocolate thumbprint cookies?
To maintain the freshness of your chocolate thumbprint cookies, store them in an airtight container at room temperature. This can keep them soft and delicious for about a week. If you want to extend their shelf life, consider freezing them. Just ensure they cool completely before placing them in a freezer-safe bag or container. Thaw them at room temperature before serving for the best taste and texture.
Can I use different fillings for chocolate thumbprint cookies?
Absolutely! While traditional recipes often call for fruit preserves or chocolate ganache, you can experiment with various fillings to suit your taste. Nut butters, caramel sauce, or even flavored icing can work wonderfully as alternatives. Feel free to get creative and customize your chocolate thumbprint cookies based on your preferences and seasonal ingredients.
Are chocolate thumbprint cookies suitable for special diets?
Depending on the ingredients used, chocolate thumbprint cookies can be adapted for various dietary needs. For gluten-free options, substitute regular flour with almond flour or gluten-free flour blends. You can also make a dairy-free version by using plant-based butter and dairy-free chocolate. Always check labels to ensure that each ingredient aligns with your dietary requirements.
Conclusion for Chocolate thumbprint cookies :
In conclusion, chocolate thumbprint cookies offer a delicious combination of rich flavor and customizable fillings that everyone will love. Storing these treats properly helps maintain their delightful texture and taste. Whether enjoyed fresh or frozen, these cookies are perfect for any occasion. With simple adaptations, they can cater to various dietary preferences while still delivering satisfaction in every bite. Enjoy baking and indulging in this classic treat!
Chocolate Thumbprint Cookies
- Prep Time: 15 minutes
- Cook Time: 12 minutes
- Total Time: 27 minutes
- Yield: Approximately 12 cookies 1x
- Category: Dessert
- Method: Baking
- Cuisine: American
Description
Indulge in these rich chocolate thumbprint cookies, featuring a soft, buttery texture and a delightful chocolate center—perfect for any sweet occasion!
Ingredients
- 1 cup all-purpose flour
- 1/3 cup unsweetened cocoa powder
- 1/2 cup granulated sugar
- 1/2 cup butter, softened
- 1 large egg
- 1 tsp vanilla extract
- 1 tsp baking powder
- 1/2 cup semi-sweet chocolate chips
Instructions
- Preheat Your Oven: Preheat your oven to 350°F (175°C). Line a baking sheet with parchment paper.
- Mix Dry Ingredients: In a medium bowl, whisk together the all-purpose flour, cocoa powder, and baking powder until combined.
- Cream Butter and Sugar: In a large mixing bowl, cream the softened butter and granulated sugar until light and fluffy using an electric mixer (about 3 minutes).
- Add Eggs and Vanilla: Beat in the egg and vanilla extract until well incorporated.
- Combine Wet and Dry Ingredients: Gradually mix in the dry ingredients until just combined. Fold in the chocolate chips gently.
- Shape and Bake: Scoop tablespoon-sized balls of dough onto the prepared baking sheet. Use your thumb to create an indent in each cookie. Bake for about 10-12 minutes or until slightly firm around the edges.
- Cool and Serve: Let the cookies cool slightly before transferring them to plates. Enjoy!
Nutrition
- Serving Size: 1 cookie (30g)
- Calories: 150
- Sugar: 8g
- Sodium: 75mg
- Fat: 8g
- Saturated Fat: 5g
- Unsaturated Fat: 3g
- Trans Fat: 0g
- Carbohydrates: 18g
- Fiber: 1g
- Protein: 2g
- Cholesterol: 25mg
Keywords: Chill the dough briefly before baking to prevent excessive spreading. For variations, try filling the thumbprint with raspberry jam or peanut butter instead of chocolate!

Leave a Comment